
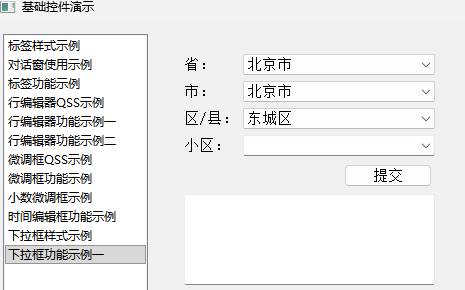
一、在省、市、县的选择
数据准备
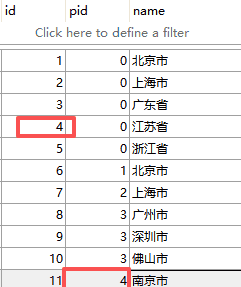
我们用sqlite3数据库作为后援。
表结构
CREATETABLE [city](
  [id] INTEGERPRIMARY KEY AUTOINCREMENT UNIQUE,
  [pid] INTEGER,
  [name] CHAR(256));
pid用于所属的上级,
比如”南京“属于”江苏省“。
数据部分(只是部分数据,演示够用了)
功能实现
实现的核心逻辑,
关联QComboBox的信号
void currentIndexChanged(int)
当信号触发时,
引导下级更新数据列表。
构造函数中先初始化省份数据
db_ = new DataBase("data.db");
db_->querySql("select id,name from city where pid = 0", rets, rows, cols);
ui->comboBox->blockSignals(true);
for(int row=0; row<rows; row++)
{
    int id = rets.at(row*cols+0).toInt();
    QString name = rets.at(row*cols+1);
    ui->comboBox->addItem(name, id);
}
ui->comboBox->blockSignals(false);
ui->comboBox->setCurrentIndex(0);
on_comboBox_currentIndexChanged(0);
1、DataBase类封装了数据库的查询,
方便我们查询数据,
(后面再说这个吧,本次先不说它了!)
2、pid为0就是省份。
3、添加项
void addItem(

    const QString& name,

    const QVariant& userData = Qvariant()

)
这个函数允许我们添加名称的同时,
可以再放一个用户数据进去,
所以我们就把ID塞进去。
4、信号阻断
blockSignals(bool)
这个函数能防止信号的触发,
在这个示例中很有用,
因为每添加一个item时,
都会触发信号,
这不是我们想要的。
我们需要的是,
添加时不要触发信号,
减少不必要的数据库查询。
(都用到这个函数了,后头找时间也写写Qt的根基—QObject)
5、手动调用下级更新
on_comboBox_currentIndexChanged(0);
这是我们的信号关联函数,
用来监听上级变化时,
及时更新相对应的内容。
//省变化
void DialogFunctionComboBox::on_comboBox_currentIndexChanged(int index)
{
    int pid = ui->comboBox->itemData(index).toInt();
    db_->querySql(QString("select id,name from city where pid = %1").arg(pid), rets, rows, cols);
    ui->comboBox_2->blockSignals(true);
    ui->comboBox_2->clear();
    for(int row=0; row<rows; row++)
    {
        int id = rets.at(row*cols+0).toInt();
        QString name = rets.at(row*cols+1);
        ui->comboBox_2->addItem(name, id);
    }
    ui->comboBox_2->blockSignals(false);
    ui->comboBox_2->setCurrentIndex(0);
    on_comboBox_2_currentIndexChanged(0);
}
可以看到,
和初始化省份内容差不多,
区别在于用的pid的不再是0了。
pid从哪来了呢?
QVariant itemData(

    int index,

    int role = Qt::UserRole

) const
前面塞进去的id数据,
通过这个函数就能再取出来了。
6、后面照搬模式,
配合数据语句,
就能很容易地实现出这种级联关系。
看下完整的代码实现:
#include "dialogfunctioncombobox.h"
#include "ui_dialogfunctioncombobox.h"

DialogFunctionComboBox::DialogFunctionComboBox(QWidget *parent) :
    QDialog(parent),
    ui(new Ui::DialogFunctionComboBox)
{
    ui->setupUi(this);
    this->setWindowFlags(Qt::Widget);
    db_ = new DataBase("data.db");
    db_->querySql("select id,name from city where pid = 0", rets, rows, cols);
    ui->comboBox->blockSignals(true);
    for(int row=0; row<rows; row++)
    {
        int id = rets.at(row*cols+0).toInt();
        QString name = rets.at(row*cols+1);
        ui->comboBox->addItem(name, id);
    }
    ui->comboBox->blockSignals(false);
    ui->comboBox->setCurrentIndex(0);
    on_comboBox_currentIndexChanged(0);
}
DialogFunctionComboBox::~DialogFunctionComboBox()
{
    delete ui;
}
//省变化
void DialogFunctionComboBox::on_comboBox_currentIndexChanged(int index)
{
    int pid = ui->comboBox->itemData(index).toInt();
    db_->querySql(QString("select id,name from city where pid = %1").arg(pid), rets, rows, cols);
    ui->comboBox_2->blockSignals(true);
    ui->comboBox_2->clear();
    for(int row=0; row<rows; row++)
    {
        int id = rets.at(row*cols+0).toInt();
        QString name = rets.at(row*cols+1);
        ui->comboBox_2->addItem(name, id);
    }
    ui->comboBox_2->blockSignals(false);
    ui->comboBox_2->setCurrentIndex(0);
    on_comboBox_2_currentIndexChanged(0);
}
//市变化
void DialogFunctionComboBox::on_comboBox_2_currentIndexChanged(int index)
{
    int pid = ui->comboBox_2->itemData(index).toInt();
    db_->querySql(QString("select id,name from city where pid = %1").arg(pid), rets, rows, cols);
    ui->comboBox_3->blockSignals(true);
    ui->comboBox_3->clear();
    for(int row=0; row<rows; row++)
    {
        int id = rets.at(row*cols+0).toInt();
        QString name = rets.at(row*cols+1);
        ui->comboBox_3->addItem(name, id);
    }
    ui->comboBox_3->blockSignals(false);
    ui->comboBox_3->setCurrentIndex(0);
    on_comboBox_3_currentIndexChanged(0);
}
//区/县变化
void DialogFunctionComboBox::on_comboBox_3_currentIndexChanged(int index)
{
    int pid = ui->comboBox_3->itemData(index).toInt();
    db_->querySql(QString("select id,name from city where pid = %1").arg(pid), rets, rows, cols);
    ui->comboBox_4->blockSignals(true);
    ui->comboBox_4->clear();
    for(int row=0; row<rows; row++)
    {
        int id = rets.at(row*cols+0).toInt();
        QString name = rets.at(row*cols+1);
        ui->comboBox_4->addItem(name, id);
    }
    ui->comboBox_4->blockSignals(false);
    ui->comboBox_4->setCurrentIndex(0);
}
//提交
void DialogFunctionComboBox::on_pushButton_clicked()
{
    ui->textEdit->clear();
    ui->textEdit->append("省:" + ui->comboBox->currentText());
    ui->textEdit->append("市:"+ui->comboBox_2->currentText());
    ui->textEdit->append("县:"+ui->comboBox_3->currentText());
    ui->textEdit->append("小区:"+ui->comboBox_4->currentText());
}
最后用来表示小区的QComboBox
setEditable(bool editable)
开启了编辑模式,
既可以下拉选择,
也允许手动修改。
二、QComboBox其它实用功能
1、检索关键字
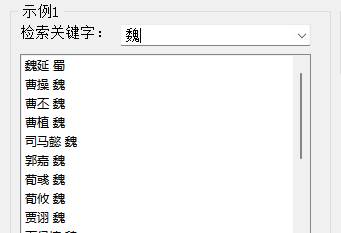
void setCompleter(QCompleter*)
设置自动补全
示例中,
输入关键字“刘”,
然后自动弹出刘相关的内容,
和QLineEdit如出一辙!
 ui->comboBox_2->addItems({"魏","蜀","吴","群"});
    QCompleter* cp = new QCompleter(names_);
    ui->comboBox_2->setCompleter(cp);
void editTextChanged(const QString& text)
文本变化信号
void currentIndexChanged(const QString& text)
当前下标变化
两个信号监听着关键字变化,
有变化就立即重新检索内容。
void DialogFunctionComboBox2::on_comboBox_2_currentIndexChanged(const QString &arg1)
{
    QStringList names = names_.filter(arg1);
    ui->listWidget->clear();
    ui->listWidget->addItems(names);
}
void DialogFunctionComboBox2::on_comboBox_2_editTextChanged(const QString &arg1)
{
    on_comboBox_2_currentIndexChanged(arg1);
}
names_是QStringList类型,
正好也提供了过滤函数filter,
所以我们把关键字丢给它,
它就自动把过滤好的结果返回出来,
我们再把它搬到listWidget就OK。
void setDuplicatesEnabled(bool enable)
打开记录副本
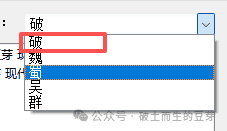
void setInsertPolicy(QComboBox::InsertPolicy)
插入策略
支持的插入位置:
QComboBox::NoInsert
QComboBox::InsertAtTop
QComboBox::InsertAtCurrent
QComboBox::InsertAtBottom
QComboBox::InsertAfterCurrent
QComboBox::InsertBeforeCurrent
QComboBox::InsertAlphabetically
在示例中怎么体现了呢?
就是输入 “破” 的时候,按下回车键,
“破” 字就自动插入到下拉列表中去了。
显示在第一行,
是因为示例中设置了InsertAtTop。
2、下拉框多显示点东西

void setMaxVisibleItems(int maxItems)
设置最大可见项的数量
默认是显示10个,
示例中改为了30个,
当下拉内容比较多的时候,
会很有用滴。
3、加个图标
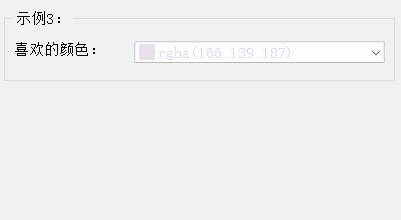
void addItem(

    const QIcon &icon,

    const QString &text,

    const QVariant &userData = QVariant()

)
添加项时可以指定QIcon
示例中主要是为体现颜色
用填充QPixmap的方式生成QIcon就行
ui->comboBox_3->setItemDelegate(new ItemHeightDelegate(36));
    for(int i=0; i<=255; i++)
    {
        QColor cl(rand()%256, rand()%256, rand()%256, rand()%256);
        QPixmap pixmap(16,16);
        pixmap.fill(cl);
        ui->comboBox_3->addItem(
            QIcon(pixmap),
            QString("rgba(%1 %2 %3)").arg(cl.red()).arg(cl.green()).arg(cl.blue()),
            cl
        );
    }
没错,又用了代理把项的高度调高了,
void setItemDelegate(QAbstractItemDelegate*)
直接给下拉框的项设置自定义代理
颜色是随机数生成的,
生成的颜色用fill填充到pixmap,
然后再用QIcon(pixmap)创建Icon。
颜色的变化实现,
就简单修改了下显示样式
void DialogFunctionComboBox2::on_comboBox_3_activated(int index)
{
    QColor cl = ui->comboBox_3->currentData().value<QColor>();
    ui->comboBox_3->setStyleSheet(
        QString(R"(QComboBox{color:rgba(%1,%2,%3,%4)})")
        .arg(cl.red())
        .arg(cl.green())
        .arg(cl.blue())
        .arg(cl.alpha())
    );
}
这里用了另一个信号函数
void activated(const QString &text)激活项
和currentIndexChanged的区别在于
activated每次点击项时都会触发,
不论选择的项是否发生确实发生了变化。


暂无评论内容