
“本文转载自:[DroidPhone]的Linux ALSA声卡驱动之三:PCM设备的创建”
1.PCM介绍
PCM是英文Pulse-code modulation的缩写,中文译名是脉冲编码调制。在现实生活中,人耳听到的声音是模拟信号,PCM就是要把声音从模拟转换成数字信号的一种技术,他的原理简单地说就是利用一个固定的频率对模拟信号进行采样,采样后的信号在波形上看就像一串连续的幅值不一的脉冲,把这些脉冲的幅值按必定的精度进行量化,这些量化后的数值被连续地输出、传输、处理或记录到存储介质中,所有这些组成了数字音频的产生过程。
- 图1:模拟音频的采样、量化

PCM信号的两个重大指标是采样频率和量化精度,目前,CD音频的采样频率一般为44100Hz,量化精度是16bit。一般,播放音乐时,应用程序从存储介质中读取音频数据(MP3、WMA、AAC……),经过解码后,最终送到音频驱动程序中的就是PCM数据,反过来,在录音时,音频驱动不停地把采样所得的PCM数据送回给应用程序,由应用程序完成压缩、存储等任务。所以,音频驱动的两大核心任务就是:
- playback:如何把用户空间的应用程序发过来的PCM数据,转化为人耳可以辨别的模拟音频
- capture:把mic拾取到得模拟信号,经过采样、量化,转换为PCM信号送回给用户空间的应用程序
2.alsa-driver中的PCM中间层
ALSA已经为我们实现了功能强劲的PCM中间层,自己的驱动中只要实现一些底层的需要访问硬件的函数即可。要访问PCM的中间层代码,第一要包含头文件<sound/pcm.h>,另外,如果需要访问一些与 hw_param相关的函数,可能也要包含<sound/pcm_params.h>。
每个声卡最多可以包含4个pcm的实例,每个pcm实例对应一个pcm设备文件。pcm实例数量的这种限制源于linux设备号所占用的位大小,如果后来使用64位的设备号,我们将可以创建更多的pcm实例。不过大多数情况下,在嵌入式设备中,一个pcm实例已经足够了。一个pcm实例由一个playback stream和一个capture stream组成,这两个stream又分别有一个或多个substreams组成。
- 图2:声卡中的pcm结构
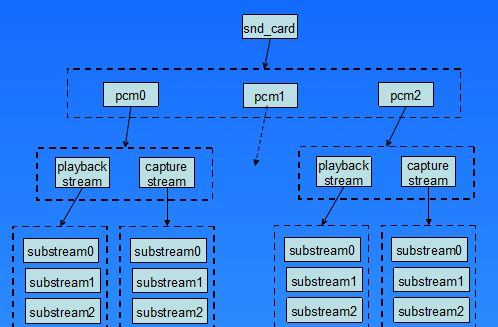
在嵌入式系统中,一般不会像上图中这么复杂,大多数情况下是一个声卡,一个pcm实例,pcm下面有一个playback和capture stream,playback和capture下面各自有一个substream。 下面一张图列出了pcm中间层几个重大的结构。
- include/sound/pcm.h

- snd_pcm是挂在snd_card下面的一个snd_device;
- snd_pcm中的字段:streams[2],该数组中的两个元素指向两个snd_pcm_str结构,分别代表playback stream和capture stream;
- snd_pcm_str中的substream字段,指向snd_pcm_substream结构;
- snd_pcm_substream是pcm中间层的核心,绝大部分任务都是在substream中处理,尤其是他的ops(snd_pcm_ops)字段,许多user空间的应用程序通过alsa-lib对驱动程序的请求都是由该结构中的函数处理。它的runtime字段则指向snd_pcm_runtime结构,snd_pcm_runtime记录这substream的一些重大的软件和硬件运行环境和参数。
3.新建一个pcm
alsa-driver的中间层已经为我们提供了新建pcm的api:
- sound/core/pcm.c
int snd_pcm_new(struct snd_card *card, const char *id, int device,
                int playback_count, int capture_count, struct snd_pcm **rpcm)
{
        return _snd_pcm_new(card, id, device, playback_count, capture_count,
                        false, rpcm);
}
- device 表明目前创建的是该声卡下的第几个pcm,第一个pcm设备从0开始;
- playback_count 表明该pcm将会有几个playback substream;
- capture_count 表明该pcm将会有几个capture substream。
另一个用于设置pcm操作函数接口的api,但必须在创建snd_pcm后执行:
- sound/core/pcm_lib.c
void snd_pcm_set_ops(struct snd_pcm *pcm, int direction,
                     const struct snd_pcm_ops *ops)
{
        struct snd_pcm_str *stream = &pcm->streams[direction];
        struct snd_pcm_substream *substream;

        for (substream = stream->substream; substream != NULL; substream = substream->next)
                substream->ops = ops;
}
新建一个pcm可以用下面一张新建pcm的调用的序列图进行描述:参考第二章 3.声卡建立实例分析
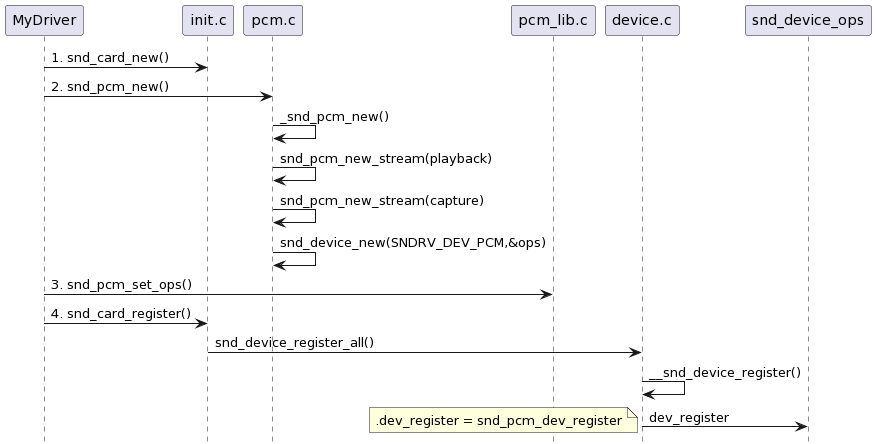
- snd_card_new pcm是声卡下的一个设备(部件),所以第一步是要创建一个声卡;
- snd_pcm_new 调用该api创建一个pcm,才该api中会做以下事情
- 如果有,建立playback stream,相应的substream也同时建立
- 如果有,建立capture stream,相应的substream也同时建立
- 调用snd_device_new()把该pcm挂到声卡中,参数ops中的dev_register字段指向了函数snd_pcm_dev_register,这个回调函数会在声卡的注册阶段被调用。
- snd_pcm_set_ops 设置操作该pcm的控制/操作接口函数,参数中的snd_pcm_ops结构中的函数一般就是我们驱动要实现的函数;
- snd_card_register 注册声卡,在这个阶段会遍历声卡下的所有逻辑设备,并且调用各设备的注册回调函数,对于pcm,就是第二步提到的snd_pcm_dev_register函数,该回调函数建立了和用户空间应用程序(alsa-lib)通信所用的设备文件节点:/dev/snd/pcmCxxDxxp和/dev/snd/pcmCxxDxxc
4.设备文件节点的建立
4.1 snd_minor
紧接上第3节中snd_pcm_dev_register函数会调用snd_register_device,它会去创建设备文件节点dev/snd/pcmCxxDxxp、pcmCxxDxxc。本章从该函数开始分析设备文件节点的创建过程。
- sound/core/sound.c
int snd_register_device(int type, struct snd_card *card, int dev,
                        const struct file_operations *f_ops,
                        void *private_data, struct device *device)
{
        int minor;
        int err = 0;
        struct snd_minor *preg;

        if (snd_BUG_ON(!device))
                return -EINVAL;

        preg = kmalloc(sizeof *preg, GFP_KERNEL); // 步骤1
        if (preg == NULL)
                return -ENOMEM;
        preg->type = type;
        preg->card = card ? card->number : -1;
        preg->device = dev;
        preg->f_ops = f_ops;
        preg->private_data = private_data;
        preg->card_ptr = card;
        mutex_lock(&sound_mutex);
        minor = snd_find_free_minor(type, card, dev); // 步骤2
        if (minor < 0) {
                err = minor;
                goto error;
        }

        preg->dev = device;
        device->devt = MKDEV(major, minor);
        err = device_add(device); // 步骤3
        if (err < 0)
                goto error;

        snd_minors[minor] = preg; // 步骤4
 error:
        mutex_unlock(&sound_mutex);
        if (err < 0)
                kfree(preg);
        return err;
}
- 步骤1:分配并初始化一个snd_minor结构中的各字段
- type:SNDRV_DEVICE_TYPE_PCM_PLAYBACK/SNDRV_DEVICE_TYPE_PCM_CAPTURE
- card: card的编号
- device:pcm实例的编号,大多数情况为0
- f_ops:snd_pcm_f_ops
- private_data:指向该pcm的实例
- 步骤2:根据type,card和pcm的编号,确定数组的索引值minor,minor也作为pcm设备的此设备号
- 步骤3:调用device_add创建设备节点
- 步骤4:把该snd_minor结构的地址放入全局数组snd_minors[minor]中
每个snd_minor结构体保存了声卡下某个逻辑设备的上下文信息,它在逻辑设备建立阶段被填充,在逻辑设备被使用时就可以从该结构体中得到相应的信息。pcm设备也不例外,也需要使用该结构体。
- include/sound/core.h
struct snd_minor {
        int type;                        /* SNDRV_DEVICE_TYPE_XXX */
        int card;                        /* card number */
        int device;                        /* device number */
        const struct file_operations *f_ops;        /* file operations */
        void *private_data;                /* private data for f_ops->open */
        struct device *dev;                /* device for sysfs */
        struct snd_card *card_ptr;        /* assigned card instance */
};
在sound/core/sound.c中定义了一个snd_minors指针的全局数组:
static struct snd_minor *snd_minors[SNDRV_OS_MINORS]; //SNDRV_OS_MINORS: 256
4.2 设备文件的建立
在4.1节的最后,设备文件已经建立,不过4.1节的重点在于snd_minors数组的赋值过程,在本节中,我们把重点放在设备文件中。
回到pcm的回调函数snd_pcm_dev_register()中:
- sound/core/pcm.c
static int snd_pcm_dev_register(struct snd_device *device)
{
int cidx, err;
struct snd_pcm_substream *substream;
struct snd_pcm *pcm;
if (snd_BUG_ON(!device || !device->device_data))
return -ENXIO;
pcm = device->device_data;
mutex_lock(®ister_mutex);
err = snd_pcm_add(pcm);
if (err)
goto unlock;
for (cidx = 0; cidx < 2; cidx++) {
int devtype = -1;
if (pcm->streams[cidx].substream == NULL)
continue;
switch (cidx) {
case SNDRV_PCM_STREAM_PLAYBACK:
devtype = SNDRV_DEVICE_TYPE_PCM_PLAYBACK;
break;
case SNDRV_PCM_STREAM_CAPTURE:
devtype = SNDRV_DEVICE_TYPE_PCM_CAPTURE;
break;
}
/* register pcm */
err = snd_register_device(devtype, pcm->card, pcm->device,
&snd_pcm_f_ops[cidx], pcm,
&pcm->streams[cidx].dev);
if (err < 0) {
list_del_init(&pcm->list);
goto unlock;
}
for (substream = pcm->streams[cidx].substream; substream; substream = substream->next)
snd_pcm_timer_init(substream);
}
pcm_call_notify(pcm, n_register);
unlock:
mutex_unlock(®ister_mutex);
return err;
}
以上代码我们可以看出,对于一个pcm设备,可以生成两个设备文件,一个用于playback,一个用于capture,代码中也确定了他们的命名规则:
- playback — pcmCxDxp,一般系统中只有一个声卡和一个pcm,它就是pcmC0D0p
- capture — pcmCxDxc,一般系统中只有一个声卡和一个pcm,它就是pcmC0D0c
snd_pcm_f_ops
snd_pcm_f_ops是一个标准的文件系统file_operations结构数组,它的定义在sound/core/pcm_native.c中:
const struct file_operations snd_pcm_f_ops[2] = {
        {
                .owner =                THIS_MODULE,
                .write =                snd_pcm_write,
                .write_iter =                snd_pcm_writev,
                .open =                        snd_pcm_playback_open,
                .release =                snd_pcm_release,
                .llseek =                no_llseek,
                .poll =                        snd_pcm_playback_poll,
                .unlocked_ioctl =        snd_pcm_ioctl,
                .compat_ioctl =         snd_pcm_ioctl_compat,
                .mmap =                        snd_pcm_mmap,
                .fasync =                snd_pcm_fasync,
                .get_unmapped_area =        snd_pcm_get_unmapped_area,
        },
        {
                .owner =                THIS_MODULE,
                .read =                        snd_pcm_read,
                .read_iter =                snd_pcm_readv,
                .open =                        snd_pcm_capture_open,
                .release =                snd_pcm_release,
                .llseek =                no_llseek,
                .poll =                        snd_pcm_capture_poll,
                .unlocked_ioctl =        snd_pcm_ioctl,
                .compat_ioctl =         snd_pcm_ioctl_compat,
                .mmap =                        snd_pcm_mmap,
                .fasync =                snd_pcm_fasync,
                .get_unmapped_area =        snd_pcm_get_unmapped_area,
        }
};
snd_pcm_f_ops作为snd_register_device_for_dev的参数被传入,并被记录在snd_minors[minor]中的字段f_ops中。最后,在snd_register_device中创建设备节点:
preg->dev = device;
device->devt = MKDEV(major, minor);
err = device_add(device);
具体过程这里不再分析下去,可参考
- Linux设备模型之device_add
- device_create()、device_register()、deivce_add()区别
4.3 从应用程序到驱动层pcm
4.3.1 字符设备注册
在sound/core/sound.c中有alsa_sound_init()函数,定义如下:
static int __init alsa_sound_init(void)
{
        snd_major = major;
        snd_ecards_limit = cards_limit;
        if (register_chrdev(major, "alsa", &snd_fops)) {
                pr_err("ALSA core: unable to register native major device number %d
", major);
                return -EIO;
        }
        if (snd_info_init() < 0) {
                unregister_chrdev(major, "alsa");
                return -ENOMEM;
        }
#ifndef MODULE
        pr_info("Advanced Linux Sound Architecture Driver Initialized.
");
#endif
        return 0;
}
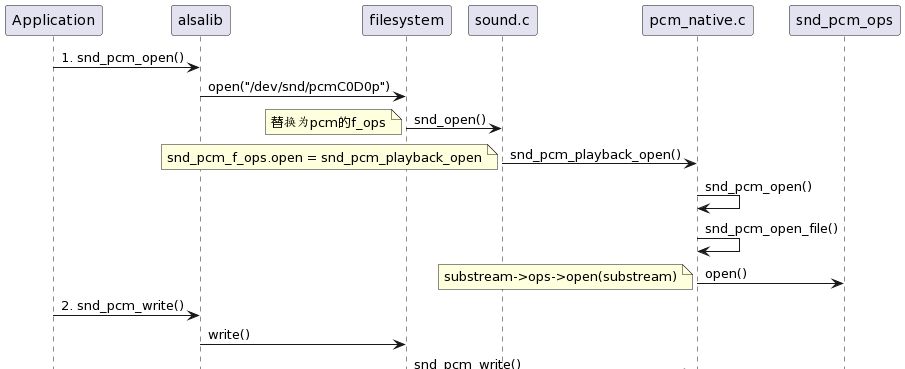
register_chrdev中的参数major与之前创建pcm设备是device_add时device->devt的major是同一个,这样的结果是,当应用程序open设备文件/dev/snd/pcmCxDxp时,会进入snd_fops的open回调函数,我们将在下一节中讲述open的过程。
4.3.2 打开pcm设备
从上一节中我们得知,open一个pcm设备时,将会调用snd_fops的open回调函数,我们先看看snd_fops的定义:
static const struct file_operations snd_fops =
{
        .owner =        THIS_MODULE,
        .open =                snd_open,
        .llseek =        noop_llseek,
};
跟入snd_open函数,它第一从inode中取出此设备号,然后以此设备号为索引,从snd_minors全局数组中取出当初注册pcm设备时填充的snd_minor结构(参看4.1节的内容),然后从snd_minor结构中取出pcm设备的f_ops,并且把file->f_op替换为pcm设备的f_ops,紧接着直接调用pcm设备的f_ops->open(),然后返回。由于file->f_op已经被替换,后来,应用程序的所有read/write/ioctl调用都会进入pcm设备自己的回调函数中,也就是4.2节中提到的snd_pcm_f_ops结构中定义的回调。代码如下:
- sound/core/sound.c
static int snd_open(struct inode *inode, struct file *file)
{
        unsigned int minor = iminor(inode);
        struct snd_minor *mptr = NULL;
        const struct file_operations *new_fops;
        int err = 0;

        if (minor >= ARRAY_SIZE(snd_minors))
                return -ENODEV;
        mutex_lock(&sound_mutex);
        mptr = snd_minors[minor];
        if (mptr == NULL) {
                mptr = autoload_device(minor);
                if (!mptr) {
                        mutex_unlock(&sound_mutex);
                        return -ENODEV;
                }
        }
        new_fops = fops_get(mptr->f_ops);
        mutex_unlock(&sound_mutex);
        if (!new_fops)
                return -ENODEV;
        replace_fops(file, new_fops);

        if (file->f_op->open)
                err = file->f_op->open(inode, file);
        return err;
}
下面的时序图展示了应用程序如何最终调用到snd_pcm_f_ops结构中的回调函数:
- 应用程序操作pcm设备


暂无评论内容