
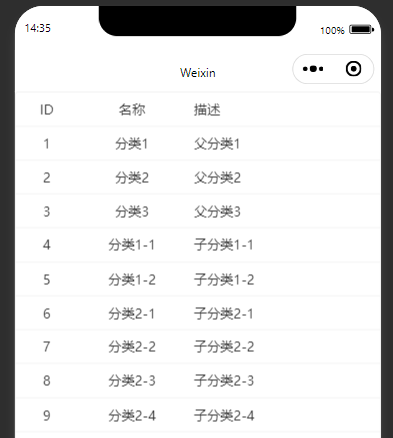
一、效果
封装表格组件,在父页面中展示表格组件并显示数据
二、表格组件
1、创建页面
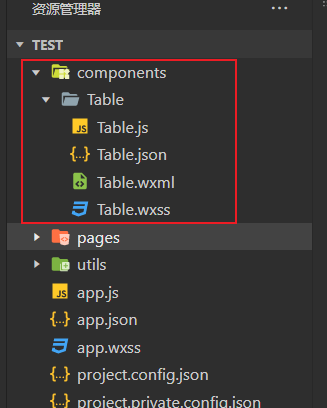
创建一个components文件夹,专门用于存储组件的文件夹
创建Table表格组件
2、视图层
(1)表头数据
这里会从父组件中传递表头数据,这里为columns,后续会讲解数据由来
循环表头数组,将表头名称,宽度进行展示
<!-- 表头 -->
<view class="table-header">
    <block wx:for="{
           {columns}}" wx:key="field">
        <view class="table-cell">{
           {item.label}}</view>
    </block>
</view>
(2)表格数据
这里从js获取表格数据tableData
循环表格数据:循环内首先循环表头,然后取出表头的field对应到表格数据行的字段进行展示
<!-- 表格数据 -->
<block wx:for="{
           {tableData}}" wx:key="id">
  <view class="table-row">
    <block wx:for="{
           {columns}}" wx:key="field" wx:for-item="column">
      <view class="table-cell">
        {
           {item[column.field]}}
      </view>
    </block>
  </view>
</block>
(3)视图层完整代码
<view class="table-container">
  <!-- 表头 -->
  <view class="table-header">
    <block wx:for="{
           {columns}}" wx:key="field">
      <view class="table-cell">{
           {item.label}}</view>
    </block>
  </view>
  <!-- 表格数据 -->
  <block wx:for="{
           {tableData}}" wx:key="id">
    <view class="table-row">
      <block wx:for="{
           {columns}}" wx:key="field" wx:for-item="column">
        <view class="table-cell">
          {
           {item[column.field]}}
        </view>
      </block>
    </view>
  </block>
</view>
3、样式层
写入表格的样式效果
样式层代码
.table-container {
  border: 1px solid #eee;
  border-radius: 8rpx;
  overflow: hidden;
}

.table-header,
.table-row {
  display: flex;
  align-items: center;
  border-bottom: 1px solid #eee;
}

.table-cell {
  padding: 16rpx;
  font-size: 28rpx;
  color: #333;
  flex-shrink: 0;
  text-align: center;
}
4、json
启用组件效果
json代码
{
  "component": true
}
5、逻辑层
(1)request请求
获取全局变量中的request请求
const request = getApp().globalData.request这里的请求可参考
微信小程序:封装request请求、解决请求路径问题-CSDN博客
(2)接收参数
从父页面会传递表头数据和请求api的路径,在这里获取
properties: {
    columns: {type: Array,value: []},
    apiUrl: {type: String,value: ''}
},
📚 拆解解析
1. properties 是什么?
properties 就像是组件的“输入接口”。
它允许你在使用组件时从父组件传入数据。
类似于 Vue 中的 props 或 React 中的 props。
2. columns 属性
columns: {
    type: Array,
    value: []
}
含义: 表格的列配置信息(表头)
type: Array :表示这个属性应该是一个数组
value: [] :默认值为空数组,如果父组件没有传这个属性,就用这个默认值
📌 示例传值(父页面):
Page({
    data: {
        columns: [
            { label: 'ID', field: 'id' },
            { label: '姓名', field: 'name' }
        ]
    }
})
3. apiUrl 属性
apiUrl: {
    type: String,
    value: ''
}
含义: 数据接口地址,组件内部会根据这个 URL 发起请求获取表格数据
type: String :表示这个属性是一个字符串(URL 路径)
value: '' :默认值为空字符串,如果没有传值,就不会发起请求
(3)获取表格行数据
定义表格变量
在data中共定义表格变量
data: {
  tableData: []
},
获取表格数据
根据父页面传递的参数,发送api请求
fetchData() {
  const apiUrl = this.data.apiUrl
  if (!apiUrl) return;
  request.post(apiUrl)
    .then(res => {
      this.setData({
        tableData: res.data || []
      });
    })
    .catch(err => {
      console.error('请求出错:', err);
    });
}
(4)进入页面执行
lifetimes: {
  attached() {
    this.fetchData();
  }
}
含义
当这个组件被添加到父页面或父组件中时(即组件被挂载) ,会自动执行 attached 生命周期函数里的内容,也就是调用 this.fetchData() 方法去请求数据。
更详细解释
lifetimes 是什么?
在小程序中,自定义组件 有自己的生命周期函数,就像页面有 onLoad、onShow 等一样。lifetimes 就是用来定义这些生命周期的。
attached 生命周期
触发时机: 当组件被插入到父组件中时触发。
用途: 初始化操作,比如:
请求接口数据
设置默认状态
绑定事件等
三、父页面引用
1、视图层
视图层直接可以引用定义的组件,然后通过属性传递参数值给表格组件
<Tables columns="{
           {columns}}" api-url="{
           {apiUrl}}" />
2、json
父组件通过在次引入表格组件,Tables即为组件名,如上视图层的效果
{
  "usingComponents": {
    "Tables": "../../components/Table/Table"
  }
}
3、逻辑层
逻辑层中的data中定义表头数据columns,和需要传递的api参数apiUrl
Page({
  data: {
    columns: [
      { label: 'ID', field: 'id', width: '50px' },
      { label: '名称', field: 'name', width: '100px' },
      { label: '描述', field: 'desc' }
    ],
    apiUrl: '/category/list'
  }
});
(1)columns 字段
columns: [
    { label: 'ID', field: 'id', width: '50px' },
    { label: '名称', field: 'name', width: '100px' },
    { label: '描述', field: 'desc' }
]
含义: 表格列配置信息(表头)
结构说明:
label: 显示在表头的文字
field: 对应数据源中的字段名
width: 可选字段,用于设置该列宽度
📌 示例配合 WXML 使用:
<block wx:for="{
           {columns}}" wx:key="field">
    <view>{
           {item.label}}</view>
</block>(2)apiUrl 字段
apiUrl: '/category/list'
含义: 接口地址,表示要请求哪个 API 获取表格数据
父页面将这个值传给自定义组件 <Tables api-url="{
{apiUrl}}" />
组件内部通过 wx.request 请求这个 URL 获取数据并展示
四、完整代码
1、表格子组件
(1)视图层
components/Table/Table.wxml
<view class="table-container">
  <!-- 表头 -->
  <view class="table-header">
    <block wx:for="{
           {columns}}" wx:key="field">
      <view class="table-cell">{
           {item.label}}</view>
    </block>
  </view>
  <!-- 表格数据 -->
  <block wx:for="{
           {tableData}}" wx:key="id">
    <view class="table-row">
      <block wx:for="{
           {columns}}" wx:key="field" wx:for-item="column">
        <view class="table-cell">
          {
           {item[column.field]}}
        </view>
      </block>
    </view>
  </block>
</view>
(2)逻辑层
components/Table/Table.js
const request = getApp().globalData.request
Component({
  properties: {
    columns: {type: Array,value: []},
    apiUrl: {type: String,value: ''}
  },
  data: {
    tableData: []
  },
  methods: {
    fetchData() {
      const apiUrl = this.data.apiUrl
      if (!apiUrl) return;
      request.post(apiUrl)
        .then(res => {
          this.setData({
            tableData: res.data || []
          });
        })
        .catch(err => {
          console.error('请求出错:', err);
        });
    }
  },
  lifetimes: {
    attached() {
      this.fetchData();
    }
  }
});
(3)样式层
components/Table/Table.wxss
.table-container {
  border: 1px solid #eee;
  border-radius: 8rpx;
  overflow: hidden;
}

.table-header,
.table-row {
  display: flex;
  align-items: center;
  border-bottom: 1px solid #eee;
}

.table-cell {
  padding: 16rpx;
  font-size: 28rpx;
  color: #333;
  flex-shrink: 0;
  text-align: center;
}
(4)JSON
components/Table/Table.json
{
  "component": true
}
1、父组件
(1)视图层
pages/index/index.wxml
<Tables columns="{
           {columns}}" api-url="{
           {apiUrl}}" />
(2)逻辑层
pages/index/index.js
Page({
  data: {
    columns: [
      { label: 'ID', field: 'id', width: '50px' },
      { label: '名称', field: 'name', width: '100px' },
      { label: '描述', field: 'desc' }
    ],
    apiUrl: '/category/list'
  }
});
(3)JSON
pages/index/index.json
{
  "usingComponents": {
    "Tables": "../../components/Table/Table"
  }
}


暂无评论内容